Creating a Landing Page in Transpond is quick and easy with our no-code drag-and-drop editor. You can start from scratch to build a completely custom page or save time by choosing from a selection of ready-made templates.
Add and arrange elements such as text, images, buttons, and sign-up forms to create a page that aligns with your brand and helps grow your audience. Whether you are collecting leads, promoting a service, or sharing important information, Landing Pages give you a simple way to create professional-looking pages without needing design or coding experience.
Creating a Landing Page
To create a new landing page:
- Go to Websites > Landing Pages
- Click + Create a Landing Page
- Give your Landing Page a meaningful name
- Select the most appropriate theme for your Landing Page
- Design your Landing Page using Blocks and Columns to achieve the desired look.
- Click Save & Close in the top right corner of the screen
Designing a Landing Page
Designing your Landing Page couldn't be simpler with Transpond's drag-and-drop editor.
Adding Columns
Using a mix of columns on your landing page lets you create flexible, responsive layouts that work across devices. It also helps you to layout the content logically and draw the reader's eye down the page.
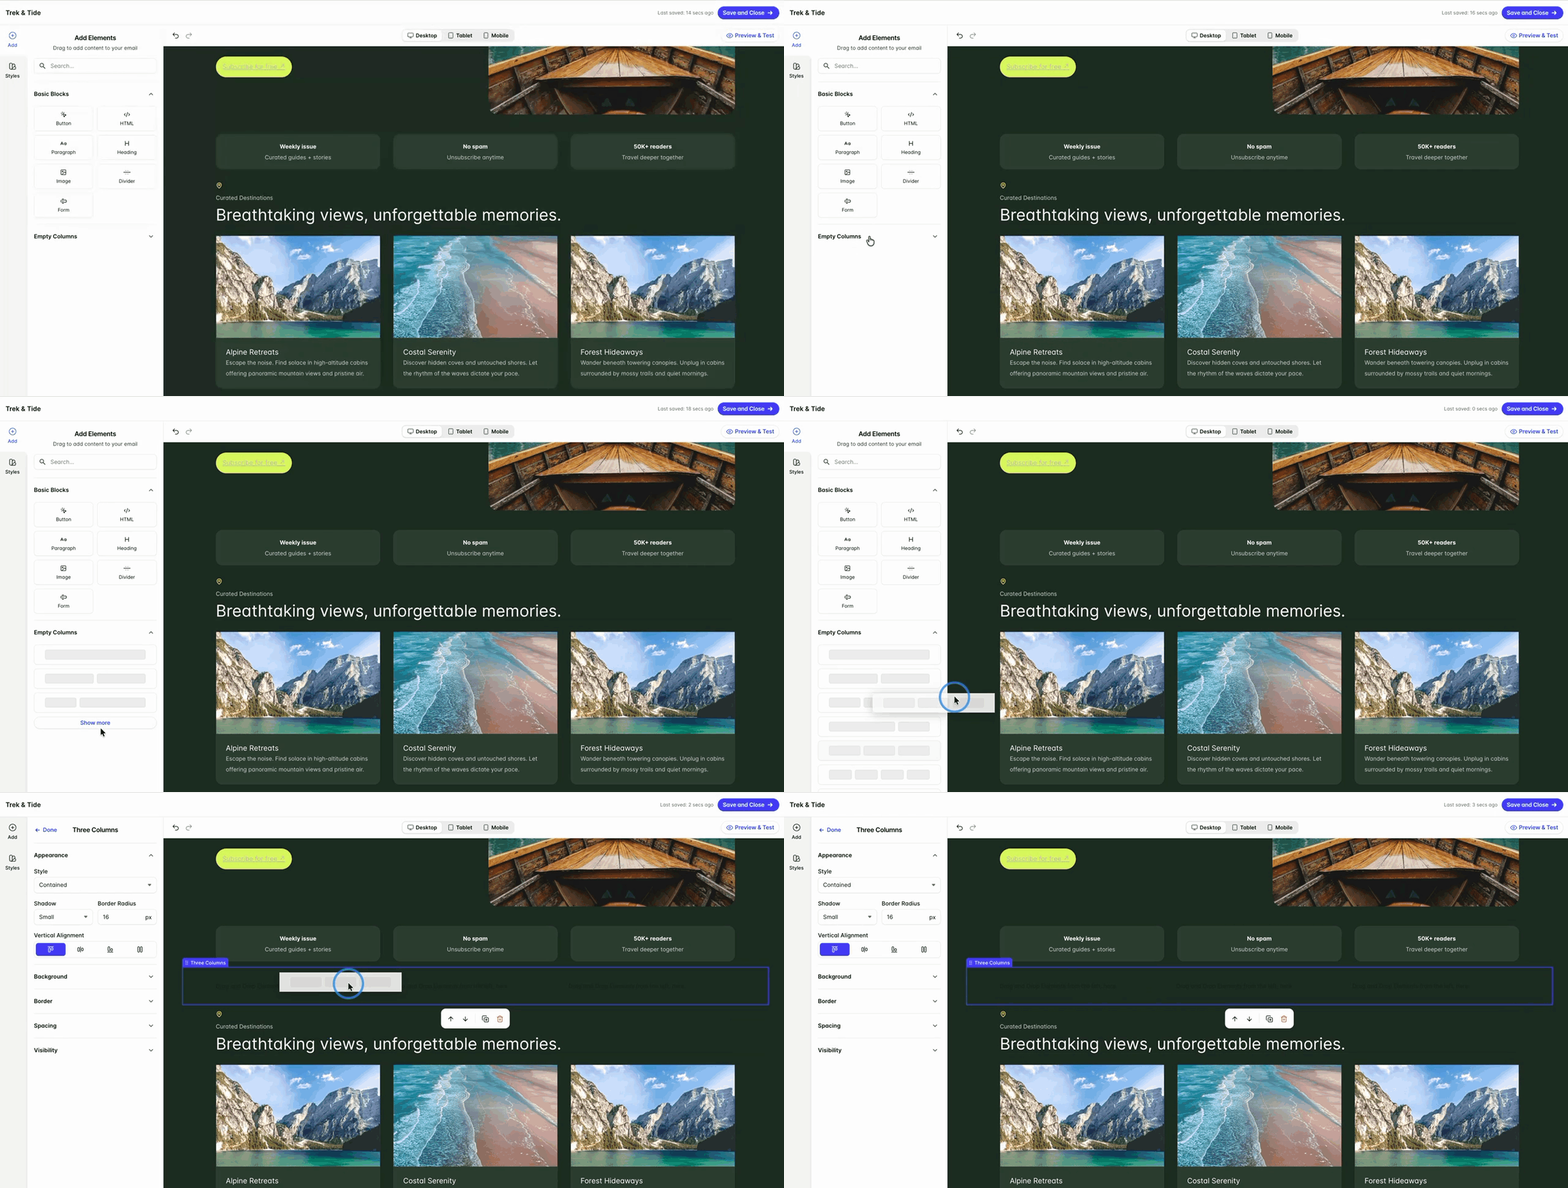
To add different columns to your Landing Page, click Empty Columns on the left-hand side of the screen, then drag and drop your preferred column format and number. You can now add Blocks within the columns for your content.
Adding Blocks
Blocks such as paragraphs, images, dividers, and buttons help you make your Landing Page visually appealing and communicate your message clearly.
Once a Block has been added to the Landing Page design, you can update its appearance by changing the font color, background color or image and the spacing around the Block.
Saving Layouts
If you've customized a column layout that you want to be able to re-use, click on the 'star' icon under the block to save it.
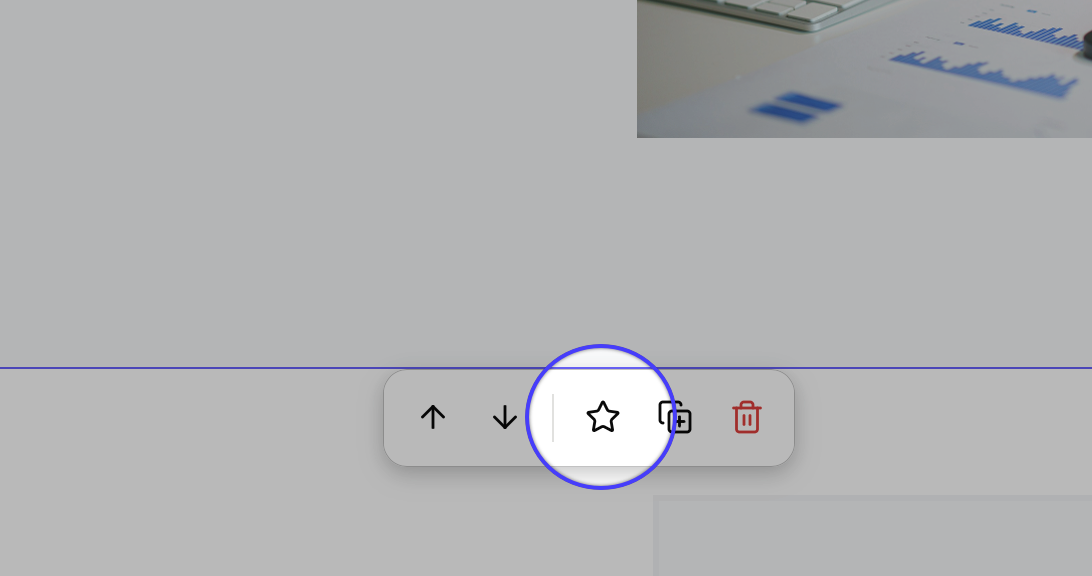
Once saved it will appear under the 'Saved layouts' for you to re-use on any landing page you add or update.
Note that Saved Layouts are available on the Growth plan and higher.
Making a Landing Page Live
Once your Landing Page is designed, it's time to make it live. Via the Settings area for the Landing Page, you can configure the URL for the page, add page keywords to help with SEO and also link your Google Analytics account to track visitor activity.
Page URL
Transpond will automatically generate a URL for your Landing Page hosted on the Transpond domain. You can customize the URL slug.
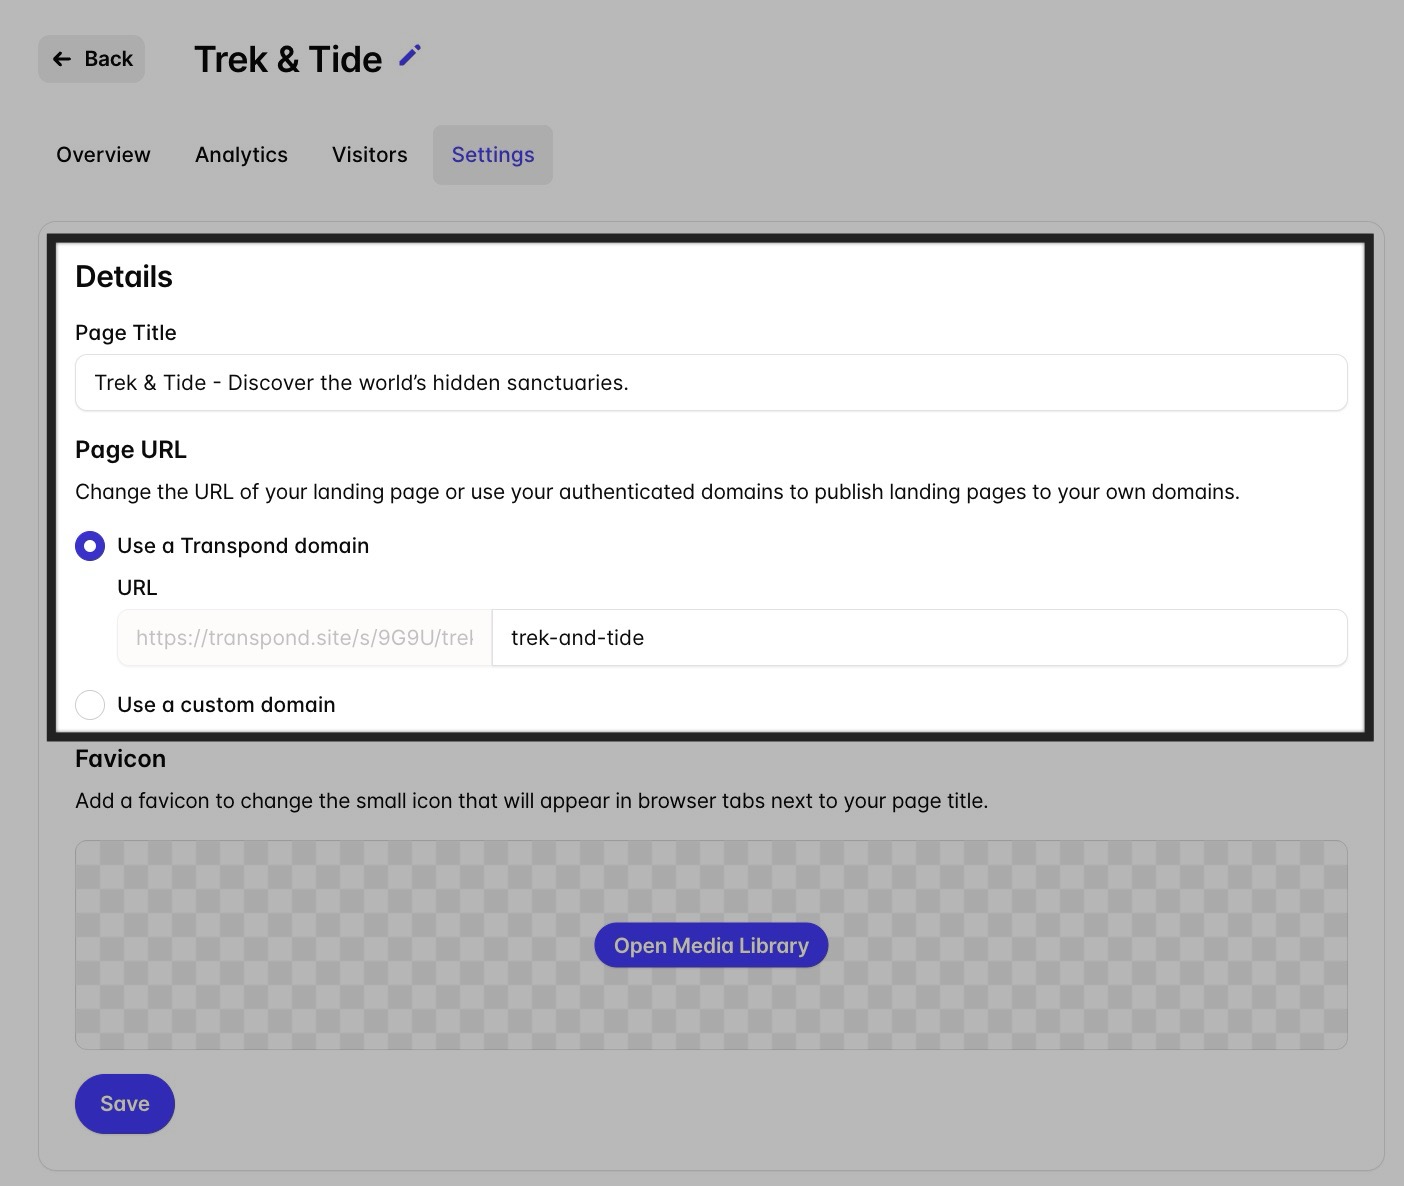
If you want your Landing Pages to be on your own custom domain, the domain must be authenticated, and you must have set up a tracking domain.
📙 Read more about Domain Authentication
Using your own custom domain helps your landing pages look more professional, trustworthy, and memorable. Instead of sharing a generic URL, you can create a branded experience that reinforces your business identity from the very first click.
Adding a Favicon
A favicon is the small icon that appears in browser tabs, bookmarks, and saved links. While it is a small detail, it plays an important role in branding, recognition, and the creation of a polished user experience.
You can use images from your Transpond Media Library or upload a new image. Transpond supports .PNG and .JPEG files for favicons.
SEO
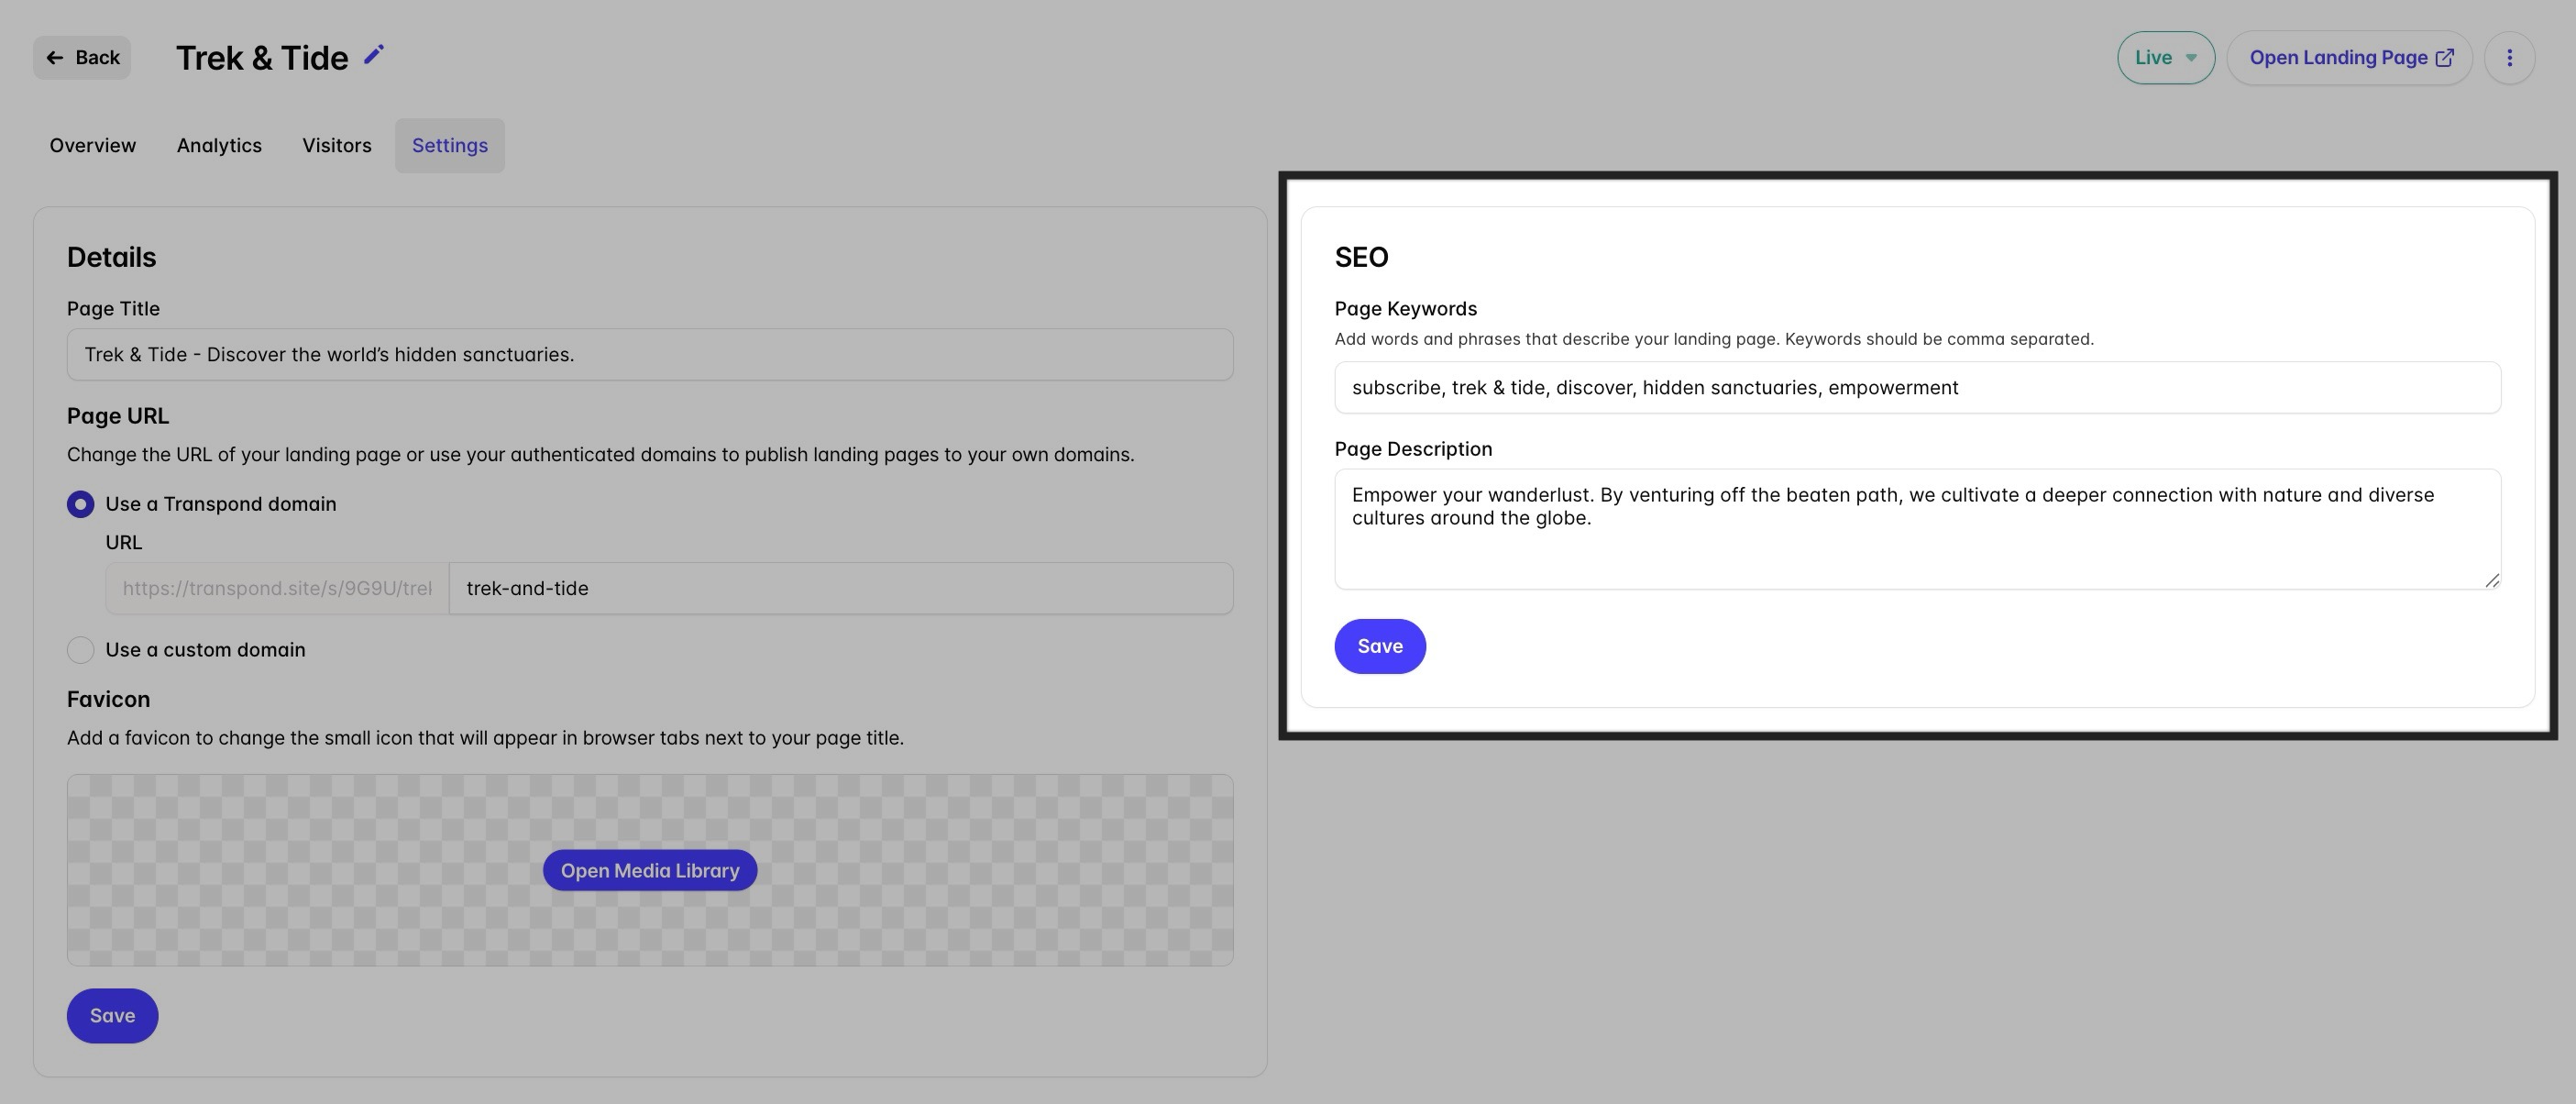
Adding keywords to your landing page settings helps search engines better understand your page content and who it is relevant for. When used thoughtfully, keywords can improve visibility in search results and help attract more qualified visitors.
Third-Party Analytic Tools
Connecting analytics tools like Google Analytics gives you deeper visibility into how visitors interact with your landing pages. Instead of only seeing basic metrics, you can better understand user behavior, campaign performance, and conversion outcomes across your marketing efforts.
To connect a third-party analytics tool, such as Google Analytics, you must be using a custom domain for your Landing Page.
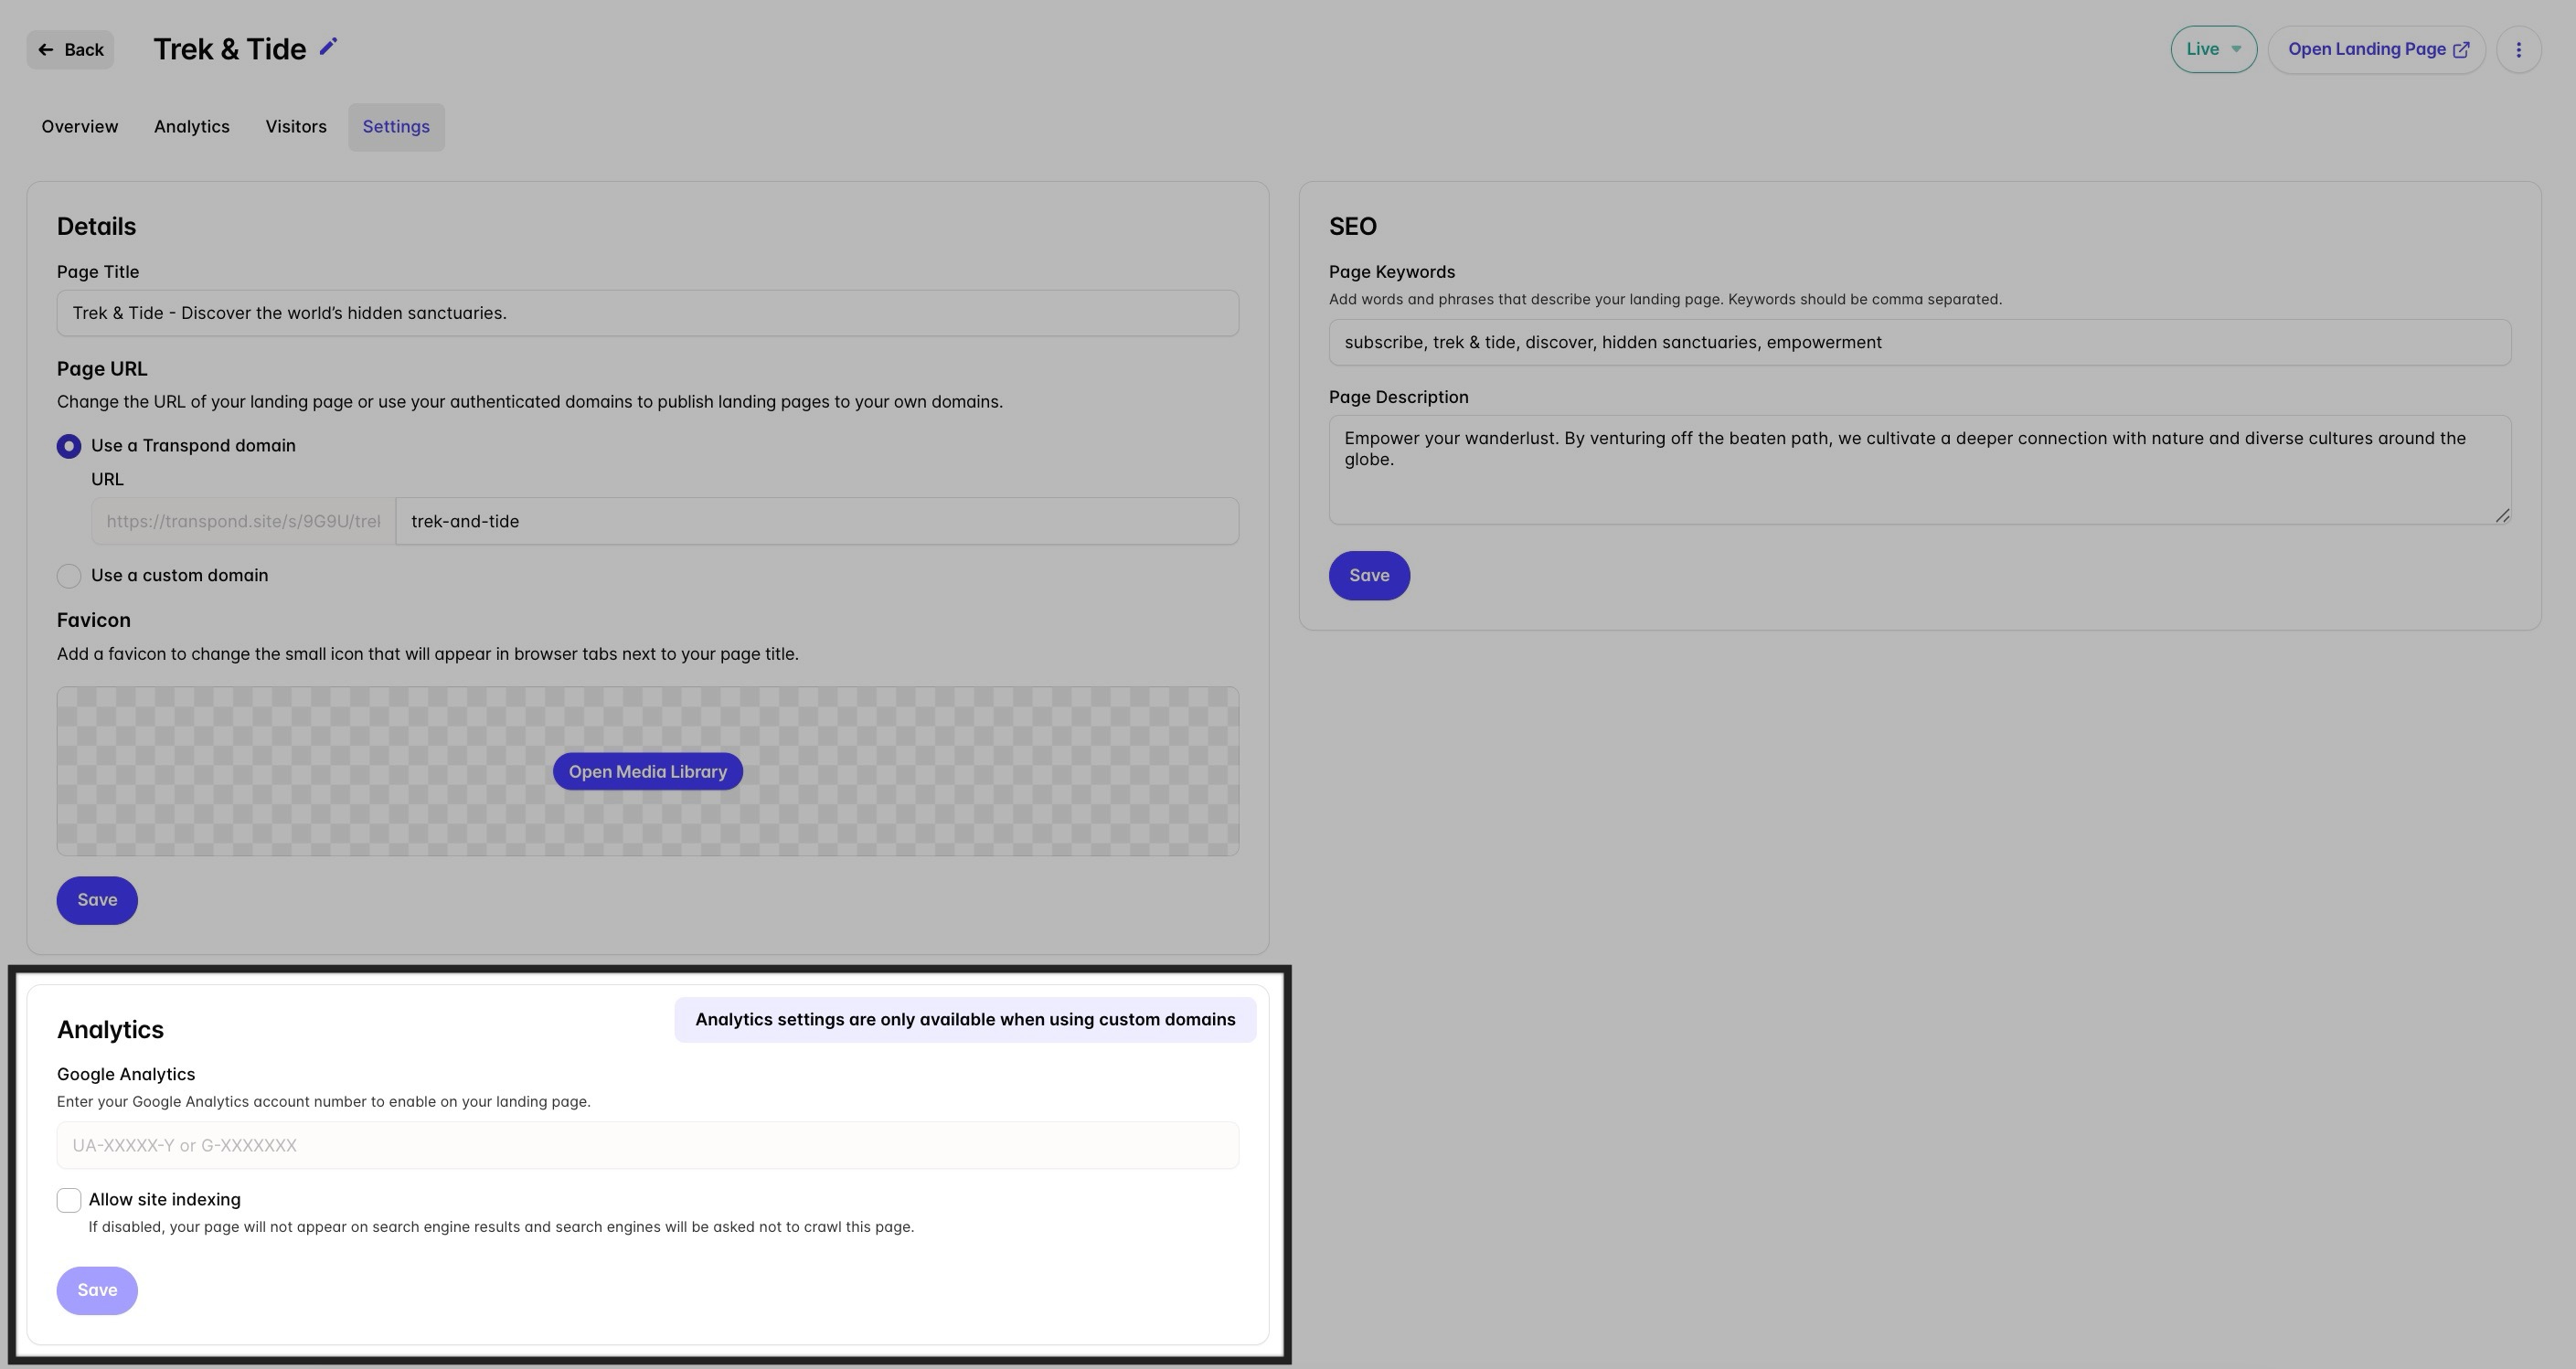
Enter your Google Analytics number to allow tracking on your Transpond Landing Page. You can also choose whether to allow site indexing. Site indexing allows search engines to discover and display your landing pages in search results. While this can be valuable for public marketing content, there are situations where keeping a landing page hidden from search engines is the better choice. For example;
- Email-only promotions
- Partner campaigns
- Invite-only events
- Internal or customer-specific content
Disabling indexing helps keep the experience focused on the intended audience.
Adding a Form to Your Landing Page
The Form block lets you build a signup form right inside your Landing Page, so you don't need a separate embedded form. Everyone who submits it is added to a contact Group of your choice, ready for your next campaign or automation.
Adding a Form Block
- In the Landing Page editor, find Form under Basic Blocks in the Add Elements panel and drag it onto your page.
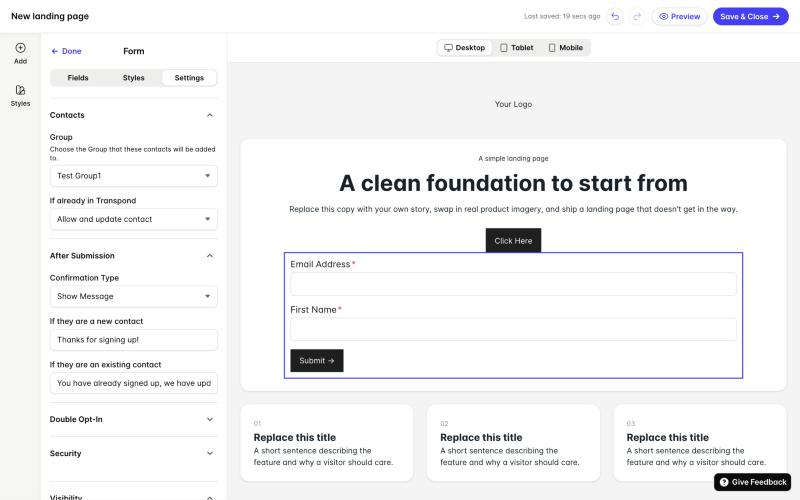
- Click the Form block to select it. The Form panel opens on the left, with three tabs: Fields, Styles and Settings.
Every form starts with an Email Address field. This field is required and can't be removed, so every submission creates or updates a contact.
Adding and Editing Fields
On the Fields tab, click Add Field, then:
- In Field, choose the contact field the answer saves to. If the field you need doesn't exist yet, click Create new Field.
- In Type, choose how the field is shown e.g. text, number, date etc.
- Under Label, enter the text that visitors see by the field.
- Turn on Required Field if visitors must fill it in.
- Click Add Field.
Your fields are listed on the Fields tab. Click the pencil icon to edit a field, or the trash icon to delete it. To change the order, drag a field by its handle. Required fields are marked with an asterisk on the form.
Choosing Where Contacts Go and What Happens Next
On the Settings tab:
- Group: choose the Group that new contacts will be added to.
- If already in Transpond: choose Allow and update contact to accept repeat submissions and update the contact's details, or Block submission to stop them.
- After Submission > Confirmation Type: choose Show Message to keep visitors on the page, or Redirect to URLto send them to another page, such as a download or thank-you page. With Show Message, you can set one message for new contacts and another for existing contacts.
Using Double Opt-In
Turn on Enable Double Opt-In if new contacts must confirm their email address before they're added to your Group. When it's on:
- Enter the confirmation email's Email Subject, From Name and From Address. The From Address is required.
- Click Open Editor under the email preview to edit the confirmation email.
- Click Open Editor under Thank you page to design the page people see after they confirm.
Protecting Your Form
Under Security, turn on Enable reCAPTCHA to protect your form from spam and bots.
Styling Your Form
On the Styles tab you can change the Button Label and Width under Appearance, and adjust the form's Background, Labels, Border and Spacing.
You can also hide the form on certain devices from the Visibility options on the Settings tab.